(24.08.07)[17주차] Spring Batch와 스케쥴링 - 활용 및 정리
(24.08.06)[17주차] Spring Batch와 스케쥴링
이전의 글에서 Spring Batch의 정의와 구성 요소 및 기능, 그리고 Quartz를 사용해서 어떻게 작동시킬 수 있을 지에 대한 내용을 정리를 했다.
하지만, 최신버전의 Spring Boot 에 따라 기존의 Spring Batch에서 많이 사용하는 Factory들이 Deprecated 됨에 따라서 패턴이 달라졌기 때문에, 최신버전의 Spring Batch 5 기준으로 코드를 직접 작성하고, 이를 분석하면서 활용에 대비하도록 한다.
Spring Batch 기본 활용
환경 설정
- Gradle Dependency 추가
implementation 'org.springframework.boot:spring-boot-starter-batch'
- (Application 세팅)
- @EnableBatchProcessing 는 Deprecated 되면서 최신 버전에서 설정을 하면 X
- 기존에는 Spring Boot 의 Batch 가 알아서 실행되변서 Bean 등록된 모든 Job을 검색해서 초기화+수행하도록 하는 Annotation
- @EnableBatchProcessing 는 Deprecated 되면서 최신 버전에서 설정을 하면 X
@SpringBootApplication
// **@EnableBatchProcessing Deprecated 되었으므로 사용X**
public class SpringBatchPracticeApplication {

  public static void main(String[] args) {
    SpringApplication.run(SpringBatchPracticeApplication.class, args);
  }

}- application.yml (또는 application.properties)
- initialize-schema 세팅
- never : DB가 Batch 스키마를 초기화 하지 않음, 자동으로 생성되는 스키마 테이블을 초기화하고 싶지 않거나, 또는 사용하지 않을 경우
- embedded : h2 등의 인메모리 저장공간과 함께 사용할 때 스키마가 생성되게 하는 것
- always : 필요 테이블을 항상 초기화, 따라서 없을경우는 무조건 생성하고 덮어쓰기 방식
spring: datasource: url: jdbc:mysql://localhost:3306/DB이름 driver-class-name: com.mysql.cj.jdbc.Driver username: 사용자 password: 비밀번호 batch: jdbc: initialize-schema: always - initialize-schema 세팅
Config 작성
@Slf4j
@Configuration
@RequiredArgsConstructor
public class BatchConfig {

  private final JobRepository jobRepository;
  private final PlatformTransactionManager transactionManager;
  private final HelloTasklet helloTasklet;

  @Bean
  public Job job() {
    log.info("job 실행");
    return new JobBuilder("myJob", jobRepository)
        .incrementer(new RunIdIncrementer())
        .start(step())
        .build();
  }

  @Bean
  public Step step() {
    log.info("step 실행");
    return new StepBuilder("myStep", jobRepository)
        .tasklet(helloTasklet, transactionManager)
        .allowStartIfComplete(true)
        .build();
  }
}- 현재는 기존의 Spring Batch에서 Job과 Step을 생성하기 위해 사용했던JobBuilderFactory와 StepBuilderFactory 가 Deprecated 되었고, JobBuilder와 StepBuilder를 사용하는 것으로 바뀜
- 동시에 JobRepository와 TransactionManager을 직접적으로 명시를 해서 사용
Job
 @Bean
  public Job job() {
    return new JobBuilder("myJob", jobRepository)
        .incrementer(new RunIdIncrementer())
        .start( (스탭) )
        .build();
  }
- Job과 Step결과에 대한 테이블이 자동으로 생성JobBuilderFactory 대신 JobBuilder 를 사용하되, 생성 시, Job의 이름과 JobRepository를 명시를 해줘야 해당 부분이 생성이 되는 것
- incrementer(new RunIdIncrementer()) : Job이 재실행이 가능 할 수있도록 각 Job에 대해서 Id를 증가해서 다르게 부여 → 재실행 가능하도록
- start( (스탭) ) : 매개변수로 Step을 주어서 Step이 실행될 수 있게끔 함
- 또다른 스탭을 연속적으로 추가하기 위해서는 .next( (스탭) ) 을 사용해서 계속 밑으로 추가해주면 가능
Step
  @Bean
  public Step step() {
    return new StepBuilder("myStep", jobRepository)
        .tasklet(helloTasklet, transactionManager)
        .allowStartIfComplete(true)
        .build();
  }
- Step 역시 Step의 이름과 JobRepository를 명시를 해줘야 해당 부분이 생성
- tasklet : step 이 수행할 어떤 작업을 정의, 글 아래에 추가적으로 HelloTasklet이 존재해야하며, step에 해당 tasklet을 사용할 수 있도록 Config 내부에 정의 또는 주입이 된 상태여야함 (아래 참고)
- transactionManager : Tasklet 의 트랜잭션을 관리하는 위에서 주입된 PlatformTransactionManager, step이 여러 작업을 수행하게 되는데 트랜잭션을 커밋하거나 롤백하는데 사용할 수 있음
- 각 Step은 독립적이기 때문에 여기서 말하는 Transaction은 한 Step에 있어서의 Transaction임
- allowStartIfComplete(true) : 이미 완료가 된 Step역시 다시 시작할 수 있도록 하며, Completed되어도 다시 시작할 수 있도록 하는 옵션
- 만약 Tasklet에서 작업이 수행될 건지, 또는 연속적으로 더 가능한지를 설정이 가능 (아래 참고)
Tasklet 정의
@Slf4j
@Component
public class HelloTasklet implements Tasklet {

  @Override
  public RepeatStatus execute(StepContribution contribution, ChunkContext chunkContext) {
    log.info("Hello, Spring Batch!");
    return RepeatStatus.FINISHED;
  }
}- 해당 Tasklet클래스는 당연히 Tasklet의 구현이 된 구현체여야함
execute 메서드
- 어떤 작업을 실행시키는 메서드
- StepContribution : 현재 Step의 상태를 업데이트 해줄 수 있는 객체
- ChunkContext : Chunk의 실행 컨텍스트를 제공해주는 객체, Step의 연속적인 실행에서 이어서 할 수 있도록 해줄 수 있는 객체
- ReapeatStatus : 작업의 상태를 반환
- .FINISHED : Tasklet의 작업이 완료가 되었고, 이제 더이상 Step에서 반복시행을 할 필요가 없다는 것을 의미,반복을 시키지 않거나, 더이상 필요 없을 때만 사용
- .CONTINUABLE : 또다른 Tasklet 에서 이어서 사용할 수 있도록 세팅을 할 수 있음, 데이터를 추가적으로 계속 이어서 처리할 때 세팅, 마무리할 수 있는 어떤 조건을 제시하지 않을 시 무한 반복되므로 주의
- 자유롭게 조건절을 주어서 특정 조건이 성립되면 Tasklet을 마무리 시키거나 조건이 성립이 안되면 계속 Continuable할 수 있도록 하는 등 사용이 가능
작동 결과
c.s.s.config.BatchConfig                 : **job 실행**
c.s.s.config.BatchConfig                 : **step 실행**
c.s.s.SpringBatchPracticeApplication     : Started SpringBatchPracticeApplication in 3.021 seconds (process running for 3.721)
o.s.b.a.b.JobLauncherApplicationRunner   : Running default command line with: []
o.s.b.c.l.support.SimpleJobLauncher      : Job: [SimpleJob: [name=myJob]] launched with the following parameters: [{}]
o.s.batch.core.job.SimpleStepHandler     : Executing step: [myStep]
c.s.s.step.tasklet.HelloTasklet          : **Hello, Spring Batch!**
o.s.batch.core.step.AbstractStep         : Step: [myStep] executed in 55ms
o.s.b.c.l.support.SimpleJobLauncher : Job: [SimpleJob: [name=myJob]] completed with the following parameters: [{}]- Spring Boot 콘솔에서 정상적으로 찍히는 모습을 볼 수 있음
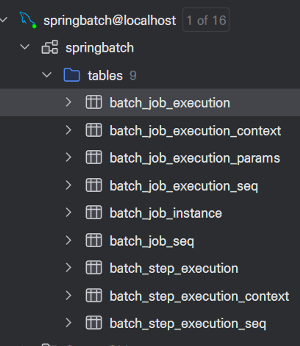
JobRepository
(위의 결과가 아닌 임의로 JobRepository를 보기 위해 Spring Batch를 작동시키고 다른 시점에서 화면 캡쳐)
- batch_job_execution
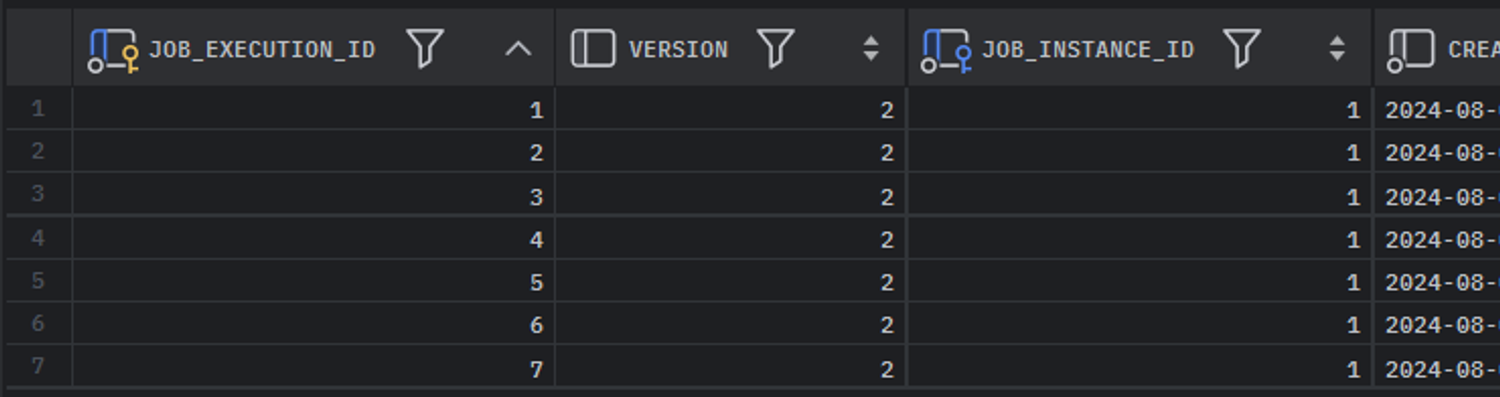
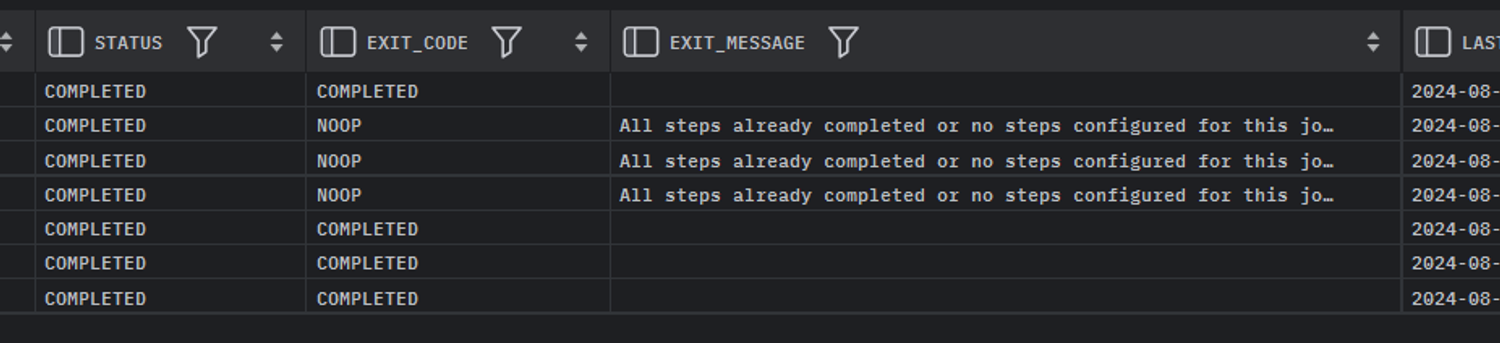
- batch_step_execution

→ 등등 실행 결과에 대해서도 정상적으로 SQL DB에 저장이 되는 모습
Quartz & Spring Batch 연동
환경 설정
- Gradle 주입
implementation 'org.springframework.boot:spring-boot-starter-quartz'
Config 작성
- QuartzConfig 의 Configuration에 지정하여 Spring Bacher의 Job 작업을 스케쥴링 가능
@Slf4j
@Configuration
@RequiredArgsConstructor
public class QuartzConfig {

  private final JobLauncher jobLauncher;
  private final JobRegistry jobRegistry;

  @Bean
  public JobDetail jobDetail() {
    return JobBuilder.newJob(BatchJobLauncher.class)
        .withIdentity("batchJobLauncher")
        .storeDurably()
        .build();
  }

  @Bean
  public Trigger trigger() {
    return TriggerBuilder.newTrigger()
        .forJob(jobDetail())
        .withIdentity("batchJobTrigger")
        .withSchedule(SimpleScheduleBuilder.simpleSchedule()
            .withIntervalInSeconds(2)
            .repeatForever())
        .build();
  }

// BatchJobLauncher는 실질적으로 Job을 할 수 있는 QuartzJobBean을 상속받은 클래스여야

  public class BatchJobLauncher extends QuartzJobBean {

    @Override
    protected void executeInternal(JobExecutionContext context) {
      try {
        JobParameters jobParameters = new JobParametersBuilder().toJobParameters();
        jobLauncher.run(jobRegistry.getJob("**myJob**"), jobParameters);
      } catch (Exception e) {
        log.info("예외 발생");
      }
    }
  }
}
JobDetail
 @Bean
    public JobDetail jobDetail() {
        return JobBuilder.newJob((특정클래스리터럴).class)
                .withIdentity("(특정클래스 고유 식별자)")
                .storeDurably()
                .build();
    }
- Quartz가 실행하고자 하는 실제 Job인터페이스 구현 클래스를 정의
- withIdentity : Trigger에서 해당 작업을 식별할 수 있는 어떤 식별자
- storeDurably : 작업의 영속석 저장, ****작업이 등록된 상태에서 트리거가 설정되지 않더라도 삭제하지 않고 실행이 될 수 있도록 함 → 작업이 재시작되고, 스케쥴이 변하더라도 작업 정의를 변경하지 않겠다는 의미
Trigger
@Bean
public Trigger trigger() {
    return TriggerBuilder.newTrigger()
            .forJob(jobDetail())
            .withIdentity("(특정클래스 고유 식별자)")
            .withSchedule(SimpleScheduleBuilder.simpleSchedule()
                    .withIntervalInMinutes(5)
                    .repeatForever())
            .build();
}- JobDetail을 실행할 스케쥴을 정의
- forJob(특정JobDetail) : 특정 JobDetail이 작동될 수 있도록 설정
- 여기서는 위에서 jobDeail() 메서드를 사용해서 return 으로 BatchJobLauncher 작업을 반환 하기 때문에 jobDetail()로 기재
- withIdentity : 작업을 할 Trigger의 식별자, Quartz 스케쥴러에서 특정 트리거를 알아차릴 수 있는 용도
- withSchedule : 스케쥴 설정, 다양하게 설정을 할 수 있음ㄴ
- SimpleScheduleBuilder.simpleSchedule() : 특정 간격 반복실행등 간단한 일정을 정의할때 사용하는 빌더
- .withIntervalInMinutes() : 반복 주기 설정 분단위로, 맨위 예시처럼 withintervalInSeconds, hour 등등으로도 가능
- .repeatForever() : 무한히 반복 설정
- CronScheduleBuilder.cronSchedule(크론 표현식) : 크론 표현식에 의한 주기 설정
- .endAt(Date endTime) : 크론스케쥴빌더를 사용할 때, 종료 시간을 설정, 없을 경우 무한히 반복
- SimpleScheduleBuilder.simpleSchedule() : 특정 간격 반복실행등 간단한 일정을 정의할때 사용하는 빌더
BatchJobLauncher
 public class BatchJobLauncher extends QuartzJobBean {

    @Override
    protected void executeInternal(JobExecutionContext context) {
      try {
        JobParameters jobParameters = new JobParametersBuilder().toJobParameters();
        jobLauncher.run(jobRegistry.getJob("**myJob**"), jobParameters);
      } catch (Exception e) {
        log.info("예외 발생");
      }
    }
}- Quartz가 실질적으로 작업할 Job interface가 구현된 어떠한 클래스
- QuartzJobBean으로 extends 받아서 만들어진 어떤 클래스를 추천
- BatchJobLauncher implements Job 처럼 인터페이스 구현체를 사용할 수는 있으나, Quartz와 연동한다는 점에서 의의를 벗어나게됨 → Spring Batch 전체 기능을 사용할 수 없을 것
- 위 Spring Batch 에서 jobRegistry에 저장을 했던 myJob을 실행하는 런처의 역할
작동결과

- 콘솔에서 맨위 .withIntervalInSeconds(2) 에 의해 2초마다 47초, 49초, 51초 이렇게 진행이 가능

- CronScheduleBuilder.cronSchedule("0 50 12 * * ?") 크론 스케쥴빌더를 사용했을 경우
- 오후 12시 50분에 해당 myJob이 실행된 것을 볼 수 있음
멀티 Job 구성
- Spring Batch에서 여러 Job과 Step을 Bean을 등록하는데에 여러개를 인식해서 등록하는 것을 기본으로 가지고 있지 않음
- 명시적으로 모든 Job과 Step이 구분이 되어있어야 Launcher로 인해 정상적으로 Spring Batch를 사용할 수 있음
멀티 Job 실행 환경 구성
  Spring:
      batch:
        jdbc:
          initialize-schema: always
        job:
enabled: false- application.yml에서 Job의 enabled를 false로 해야지 자동으로 Job 을 실행하지 않도록 설정
- 자동으로 알아서 Spring Batch 가 Job을 실행시키려고 찾으려고하는데 Job이 여러개여서 빈등록 에러를 일으킬 수 있음
- false를 사용하고, JobLauncher 역할을 Spring Batch 바깥에서 실행시키는 것 → 이 글에서는 Quartz 가 그 역할을 해주는 것
Config 작성
Batch Config
@Slf4j
@Configuration
@RequiredArgsConstructor
public class BatchConfig {

  private final JobRepository jobRepository;
  private final PlatformTransactionManager transactionManager;
  private final HelloTasklet helloTasklet;
  private final GoodbyeTasklet goodbyeTasklet;

  @Bean
  public Job helloJob() {
    log.info("helloJob 실행");
    return new JobBuilder("helloJob", jobRepository)
        .incrementer(new RunIdIncrementer())
        .start(helloStep())
        .build();
  }

  @Bean
  public Step helloStep() {
    log.info("helloStep 실행");
    return new StepBuilder("helloStep", jobRepository)
        .tasklet(helloTasklet, transactionManager)
        .allowStartIfComplete(true)
        .build();
  }

  @Bean
  public Job goodbyeJob() {
    log.info("goodbyeJob 실행");
    return new JobBuilder("goodbyeJob", jobRepository)
        .incrementer(new RunIdIncrementer())
        .start(goodbyeStep())
        .build();
  }

  @Bean
  public Step goodbyeStep() {
    log.info("goodbyeStep 실행");
    return new StepBuilder("goodbyeStep", jobRepository)
        .tasklet(goodbyeTasklet, transactionManager)
        .allowStartIfComplete(true)
        .build();
  }
}- 아무런 제약없이 이름을 구별하여 정확하게 사용할 Job과 Step을 사용해서 멀티 Job 환경을 조성
- Tasklet은 위의 예제와 같고 goodbyeTasklet은 Goodbye 문구를 출력
Quartz Config
@Slf4j
@Configuration
@RequiredArgsConstructor
public class QuartzConfig {

  private final JobLauncher jobLauncher;
  private final JobRegistry jobRegistry;

  @Bean
  public JobDetail helloJobDetail() {
    return JobBuilder.newJob(HelloJobLauncher.class)
        .withIdentity("helloJobLauncher")
        .storeDurably()
        .build();
  }

  @Bean
  public Trigger helloTrigger() {
    return TriggerBuilder.newTrigger()
        .forJob(helloJobDetail())
        .withIdentity("helloJobTrigger")
        .withSchedule(SimpleScheduleBuilder.simpleSchedule()
            .withIntervalInSeconds(3)
            .repeatForever())
        .build();
  }

  public class HelloJobLauncher extends QuartzJobBean {
    @Override
    protected void executeInternal(JobExecutionContext context) {
      try {
        JobParameters jobParameters = new JobParametersBuilder()
            .addString("timestamp", String.valueOf(System.currentTimeMillis()))
            .toJobParameters();
        jobLauncher.run(jobRegistry.getJob("helloJob"), jobParameters);
      } catch (Exception e) {
        log.info("예외 발생");
      }
    }
  }

  @Bean
  public JobDetail goodbyeJobDetail() {
    return JobBuilder.newJob(GoodbyeJobLauncherAdvanced.class)
        .withIdentity("goodbyeJobLauncher")
        .storeDurably()
        .build();
  }

  @Bean
  public Trigger goodbyeTrigger() {
    return TriggerBuilder.newTrigger()
        .forJob(goodbyeJobDetail())
        .withIdentity("goodbyeJobTrigger")
        .withSchedule(SimpleScheduleBuilder.simpleSchedule()
            .withIntervalInSeconds(2)
            .repeatForever())
        .build();
  }

  public class GoodbyeJobLauncherAdvanced extends QuartzJobBean {
    @Override
    protected void executeInternal(JobExecutionContext context) {
      try {
        JobParameters jobParameters = new JobParametersBuilder()
            .addString("timestamp", String.valueOf(System.currentTimeMillis()))
            .toJobParameters();
        jobLauncher.run(jobRegistry.getJob("goodbyeJob"), jobParameters);
      } catch (Exception e) {
        log.info("예외 발생", e);
      }
    }
  }
}- 주의할 점은 그대로 실행을 해버리면, JobParameters를 토대로 Quartz가 Job을 실행시킬때 열개의 Job을 구분할 수 있는 어떤 고유의 값을 주어야함
- 위에서는 addString 메서드를 사용해서 timestamp 라는 필드에 시스템의 시간을 찍어서 구분할 수 있도록 했음
- 구분이 없다면, JobExecutionAlreadyRunningException 예외가 발생
작동 결과
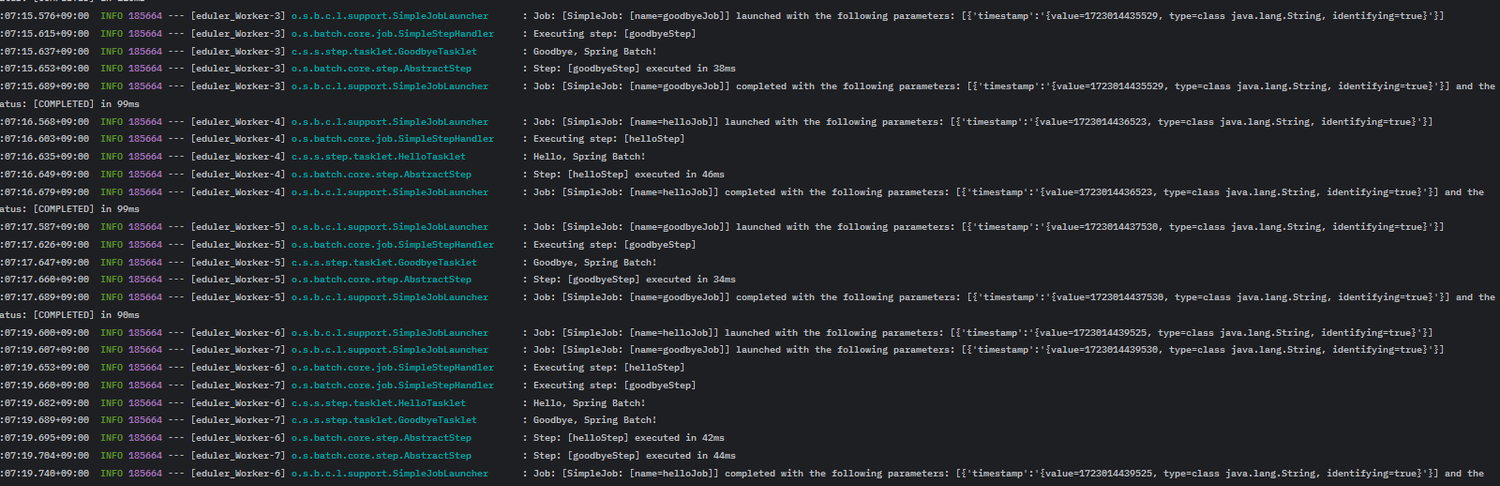
- 각각 2초 3초 잘 찍히고, 6초에는 동시에 찍히는 모습도 볼 수 있음
Spring Batch는 여러개의 작업을 순차적으로 자동으로 처리해주는 강력한 기능이며, 이를 일정한 시각에 또는 주기별로 진행하는 기능은 BE에서 매우 유용하게 활용할 수 있을 것이라고 생각한다.
Apache Camel을 사용해서 Spring Batch와 유사한 기능을 할 수 있도록 할 수 있지만, 큰 규모의 서비스에 해당하며,
효율적으로 대량의 데이터 처리가 가능하지만, 리소스가 그만큼 많이 발생하기 때문에
필요에 따라 유동적으로 Java Spring 을 공부하는 입장에서 Spring Batch를 직접적으로 사용 또는 작성된 코드를 보면서 이해를 할 필요가 있기 때문에 공부하면서 직접 샘플 코드도 쳐보면서 작동되는지 확인을 했다.

'Develop Study > Spring' 카테고리의 다른 글
| (25.02.18) Spring Boot 의 MongoDB 연결 (0) | 2025.02.18 |
|---|---|
| (24.10.14) Swagger & Spring REST Doc (2) | 2024.10.14 |
| (24.08.06)[17주차] Spring Batch와 스케쥴링 (0) | 2024.08.06 |
| (24.07.24)[15주차] Spring Data JPA Tuple 객체의 사용 (2) | 2024.07.24 |
| (24.06.28)[11주차] QueryDSL과 SQL의 비교와 정리 (0) | 2024.06.28 |


